Wednesday, July 9, 2014

Who doesn't want luscious eyelashes?

I want to start by saying Younique 3d Fiber lashes are the best thing to EVER happen to my eyes! I have always been the kind of girl that would die for long beautiful eye lashes but have never been quite talented enough to get fake ones to work for me. They always made my eyes feel weird or would make it half the night before I would lose one.

Well a few months ago this changed, I was on facebook and saw a friend I went to high school posting pictures of before and after of her eyes. I couldn't believe the difference I saw and knew this is something that I HAD TO TRY!!! I ordered the product and wanted to share my results!

I do also want to say this this takes no more then 5 minutes to do and is not messy or complicated at all! It's no trickier then applying normal mascara! I also want to say that I still use my normal drug store mascara as a base and then apply the Younique product on top.

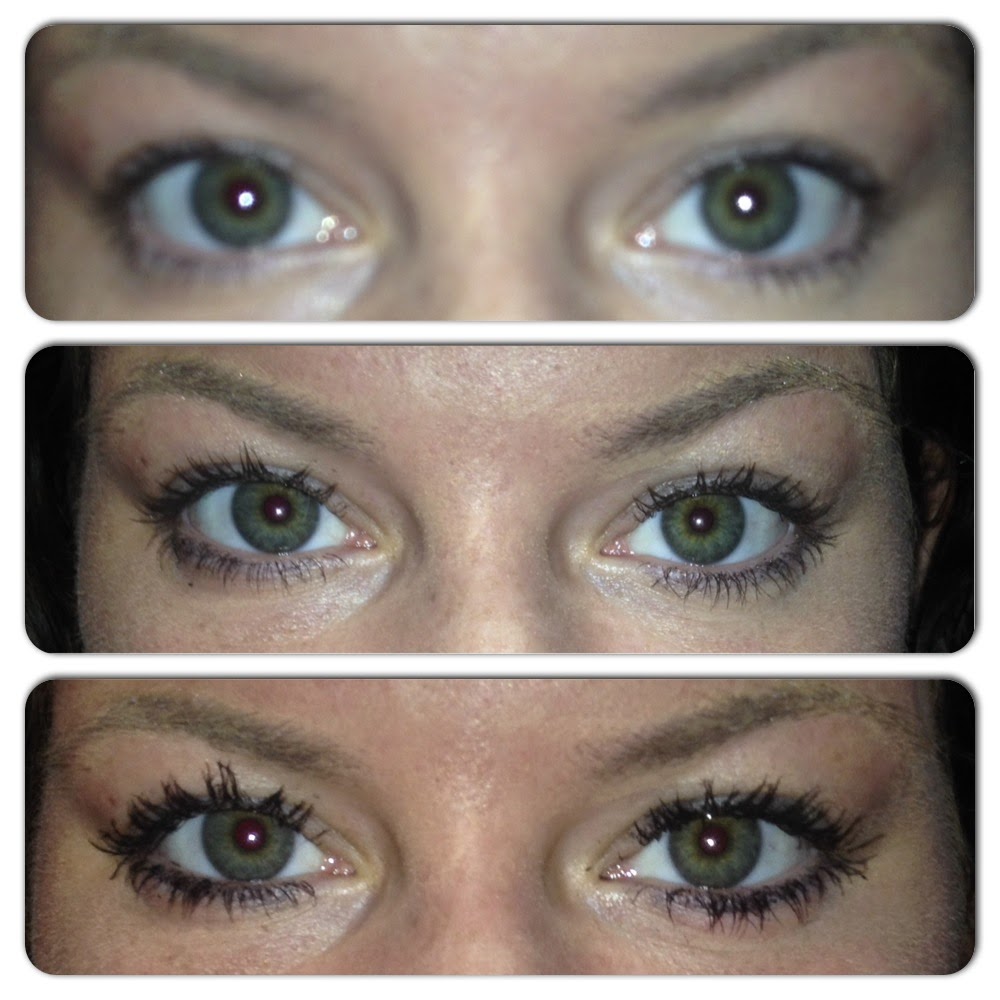
 The Top picture is me with no mascara on my eyes.
The Middle picture is me with my Revlon Lash Potion mascara
The Bottom is the final product with the Younique 3d Fiber lashes


I wanted to take a picture to show the two different tubs of the 3d fiber lashes mascara. Applying is so simple one tube is a primer and one tube is the fiber lashes. All you have to do is apply the primer then the fiber lashes and then the primer again which seals it all. Very simple and very amazing results!


To purchase the Younique 3d fiber lashes I went to:
 https://www.youniqueproducts.com/sarasosa


The No Poo Method

So while doing my daily Pinterest stalking I found lots of of chatter about people calling it quits with their shampoo and conditioner. It got me interested cause anyone that knows me knows that I am all for trying new weird things. After doing some google research this is what I found.

Apple cider vinegar works in complement to baking soda because it is a more acidic product, it balances out the effect of the baking soda to restore your hair's natural pH levels. It also helps kill bacteria and from what I have read is great if you have a dandruff problem.The next problem I had to decide upon was how should I actually go about doing this. This is the solution I came up with.

I got all of this at the Walmart down the street from my house. I decided on the 1 quart container because it had the lid I could shut and shake up the contents that were inside. I keep the spoon with the banking soda on my sink counter and before I get into the shower I add my 1 Tbl spoon to the container and fill the rest with water to the 1 pint line. From this point I give it a shake and take the container in the shower with me. I use this just like I would my shampoo I dumped it on my head gave it a scrub and continued to rinse it out. The ACV part was easy but a bit smelly at first. I quickly discovered that the cap was almost a Tbl spoon so used that as my measuring device and then filled my jug back up to the 1 pint line and dumped on my head. 

It felt kind of odd and in the shower and I did feel like I was only going to smell. (Thankfully my roommate Allie is a good sport and came and did a smell test for me and said I didn't smell like anything!)  My hair did feel quite different afterwards and I was interested in seeing how this was going to go. I brushed my hair and everything felt normal. I have very curly hair and as it dries it seems to be softer. All in all I think this is something that I shall continue to do and see where I end up a month from now.
x

Monday, May 20, 2013

DIY Laundry Soap

So a few months back I was playing around on Pinterest and I saw a post on laundry soap you could make at home and this crazy woman claimed that it lasted her a year and it only took $20 to make. This blew my mind because I was going to the store dropping 10 bucks every few weeks for laundry soap. I am the type of gal that questions everything twice and this seemed a little sketchy but I figured hey if it costs me 20 bucks that's not too bad and if it sucks it's not like a spent a fortune. Lucky for me it didn't suck it was actually quite the opposite I'm in love! I will warn you it was very annoying to make and I was happy when it was over but the money it has saved me and the fact it works so well was worth it! Another side note it honestly only took about 15 minutes and made my kitchen smell wonderful!

A few tips:

  • I bought a cheap 88 cent cheese grater because I was not about to ruin my good one
  • I bought a another cheap 1 tbs measuring spoon that I could leave in the soap container for easy measuring at laundry time
  • Make this stuff in a garbage bag it makes it easier to mix everything up. I just put the bag on my kitchen table and dumped all the ingredients in and shook it all up.
  • I found all of the the items I needed at my local Walmart

What you need:


One 4 lb 12 oz box Borax found in the detergent isle

One 4 lb box Arm & Hammer Baking Soda found in the cooking isle

One  box Arm & Hammer Super Washing Soda 55 oz found in the detergent isle

Three bars of Fels-Naptha soap, found in the detergent isle 

2 small containers of Oxy Clean or store brand Oxy Clean (try to get about 3.5 lbs total  found in the detergent isle.
( This isn't something you have to do some worry that the oxy clean will make their darks dull I have been using this for 4 months now and have not noticed a difference in my darks)

** This made my sister and niece itchy so we added purex fabric softening crystals which solved the problem plus they have all sorts of different scents so it makes it smell very nice!

The Process:
  • I first started my grating the fels-Naptha soap this was the most annoying part of the process mainly because I'm a big baby and my hand got tired and it's what took the longest
  • After that was done all I did was take my supplies and dump it into my garbage bag and shake it all up!
Here's what it looked like when it was all done!


Black Heads .. we all hate them!

Ok so I'm not sure if anyone else has the same problem I have but it seems to me that the second warm weather hits my face goes nuts! One quick fact about me I will do anything to save money I love my money, I want to spend my money on shopping, fun activities, doing cool stuff not on face products that I'm not sure if they even work. I came across this little gem of an idea a few months ago and my life hasn't been the same since! Not only is it dirt cheap it makes your skin look wonderful!


DIY Black Head Remover

Things you need:
Lemon
Honey
Knife

The Process

  1. Cut your lemon in half ( It doesn't matter if it is fresh out of your fridge or if it is coming home from the store warm)
  2. Add 3 to 4 drops of honey on one half ( I used 3 the first time put it all over my face and then made a judgement call if I needed to add more honey)
  3. Let this sticky feeling concoction sit on your black head filled skin for 5 minutes
  4. Wash your face with cold water (I used a wash cloth to do a little scrubbing as well as when my face was clean I did a little of my own extra popping... gross I know but it was so easy)

This process has changed my life... Blackheads have always been such a bitch to get off and I get them on my nose all of the time my skin always feels so heavenly afterwards and its natural.. you really can't beat this!